December 2018 - Best Blogger Designs, Tips, Tricks, Tools and Basic to Advanced Training

Best Blogger Designs, Tips, Tricks, Tools and Basic to Advanced Training

Best Blogger Designs, Tips, Tricks, Tools, Basic to Advanced Training, Money Making Tips, SEO, Traffic Genaration Methods, Free Templates, Free Hosting Tricks

Hot

Post Top Ad

Your Ad Spot

How To Change Heading Tag For Better SEO in Blogger

December 30, 2018 0
Heading Tags (h1, h2, h3, h4, h5) of a website are very important for SEO (Search Engine Optimization). All of Blogger widgets (gadgets) titles use h3 or h2 tags. Many blogger templates are using h2 or h3 tags for post titles. But If you are looking for ways to improve your site SEO, using h1 tags for post titles is a one way to do it.
Follow the simple steps below to do it:
1.Login to your Blogger account and go to "Edit HTML".
2.Now you have to find the code responsible for creating post tiles.
Blogger Post Title Code
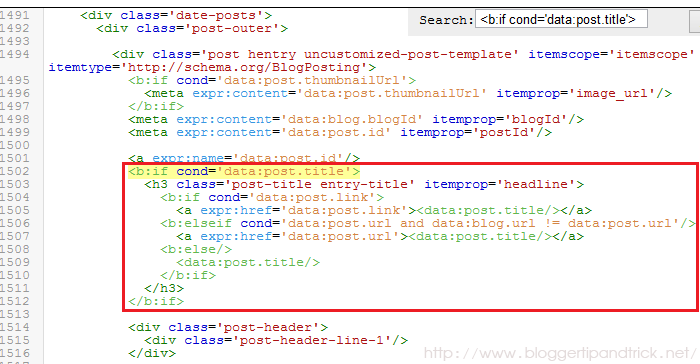
Find the code 1. But if you can not find it, find the code 2 (you will see code 1 or code 2 in 2 locations in your theme):
Code 1:
<b:if cond='data:post.title'>
<h3 class='post-title entry-title' itemprop='headline'>
<b:if cond='data:post.link'>
<a expr:href='data:post.link'><data:post.title/></a>
<b:else/>
<b:if cond='data:post.url'>
<b:if cond='data:blog.url != data:post.url'>
<a expr:href='data:post.url'><data:post.title/></a>
<b:else/>
<data:post.title/>
</b:if>
<b:else/>
<data:post.title/>
</b:if>
</b:if>
</h3>
</b:if>
Code 2:
<b:if cond='data:post.title'>
<h3 class='post-title entry-title' itemprop='headline'>
<b:if cond='data:post.link or (data:post.url and data:blog.url != data:post.url)'>
<a expr:href='data:post.link ? data:post.link : data:post.url'><data:post.title/></a>
<b:else/>
<data:post.title/>
</b:if>
</h3>
</b:if>
Note: These codes have some differences according to your template. If you can't find code 1 or code 2, search it replacing h3 with h2.
3.Now if you found code 1, replace it with below code (you have replace both code 1):
<b:if cond='data:post.title'>
<h1 class='post-title entry-title' itemprop='headline'>
<b:if cond='data:post.link'>
<a expr:href='data:post.link'><data:post.title/></a>
<b:else/>
<b:if cond='data:post.url'>
<b:if cond='data:blog.url != data:post.url'>
<a expr:href='data:post.url'><data:post.title/></a>
<b:else/>
<data:post.title/>
</b:if>
<b:else/>
<data:post.title/>
</b:if>
</b:if>
</h1>
</b:if>
If you found code 2, replace it with below code (you have replace both code 2):
<b:if cond='data:post.title'>
<h1 class='post-title entry-title' itemprop='headline'>
<b:if cond='data:post.link or (data:post.url and data:blog.url != data:post.url)'>
<a expr:href='data:post.link ? data:post.link : data:post.url'><data:post.title/></a>
<b:else/>
<data:post.title/>
</b:if>
</h1>
</b:if>
4.Click on "Save template" and now you are done.
Read More

How to Hide Blogger Post Content from Homepage

December 30, 2018 0
This tutorial will help you if you're looking for display only post titles on your site home page. After applying this modification into your Blogger theme, no longer your post content will be displayed on your blog homepage. A Visitor need to click on post title to go post page and view the post content. First backup your blogger theme first before make any change into it. Now go to "Edit HTML" page of your theme.
Find this piece of code:
<b:if cond='data:blog.metaDescription == &quot;&quot;'>
<!-- Then use the post body as the schema.org description,
for good G+/FB snippeting. -->
<div class='post-body entry-content' expr:id='&quot;post-body-&quot; + data:post.id' itemprop='description articleBody'>
<data:post.body/>
<div style='clear: both;'/> <!-- clear for photos floats -->
</div>
<b:else/>
<div class='post-body entry-content' expr:id='&quot;post-body-&quot; + data:post.id' itemprop='articleBody'>
<data:post.body/>
<div style='clear: both;'/> <!-- clear for photos floats -->
</div>
</b:if>
Replace it below code:
<b:if cond='data:blog.pageType != "index"'>

<b:if cond='data:blog.metaDescription == &quot;&quot;'>
<!-- Then use the post body as the schema.org description,
for good G+/FB snippeting. -->
<div class='post-body entry-content' expr:id='&quot;post-body-&quot; + data:post.id' itemprop='description articleBody'>
<data:post.body/>
<div style='clear: both;'/> <!-- clear for photos floats -->
</div>
<b:else/>
<div class='post-body entry-content' expr:id='&quot;post-body-&quot; + data:post.id' itemprop='articleBody'>
<data:post.body/>
<div style='clear: both;'/> <!-- clear for photos floats -->
</div>
</b:if>

</b:if>
Preview your theme before save changes. If everything is ok, save your theme and refresh your site to see changes.
Read More

How To Add Different Meta Tags to Different Blogger Posts

December 30, 2018 0
What's the use of adding different meta descriptions to different Blogger Posts?
It is very good for SEO (Search Engine Optimisation) . Actually, why we are adding meta tags is to tell search engines what that page is all about... but, using same meta tags to all of your blog posts lessens the search engine rankings and traffic little bit.
But, if you add different unique meta tags to different Blog posts, it makes the search engines to know more about your individual blog posts and make them crawl and index your pages better and it also improves your Search engine rankings for sure 😉
So, how to add this?
For this to happen, you have to add some pieces of codes to the template.
First Sign in to Blogger dashboard » Layout » Edit html
and find this line
<b:include data='blog' name='all-head-content'/>
and add this code just below that line
<b:if cond='data:blog.url == "http://www.howtoblogacademy.blogspot.com/"'>

<meta content='DESCRIPTION' name='description'/>
<meta content='KEYWORDS' name='keywords'/>

</b:if>
Now we have added meta tags to the homepage.
Next, you want to add meta description for your blogger post, for example let see how to add meta tags to below post :
http://www.howtoblogacademy.blogspot.com/2009/03/how-to-add-paypal-donate-button-to-your.html
This is the way to add meta tags to above post:
<b:if cond='data:blog.url == "http://www.howtoblogacademy.blogspot.com/2009/03/how-to-add-paypal-donate-button-to-your.html"'>

<meta content='How to add Paypal Button to your Blogger Blog, Adding Donations to your blog' name='description'/>

<meta content='Adding,Paypal,Donate,Button' name='keywords'/>

</b:if>
Now, what you have to do is pasting the above code below the home page meta tags and changing the link,description and keywords.
So, the final code now looks something like:
<b:if cond='data:blog.url == "http://www.howtoblogacademy.blogspot.com/"'>

<meta content='DESCRIPTION' name='description'/>
<meta content='KEYWORDS' name='keywords'/>

</b:if>

<b:if cond='data:blog.url == "http://www.howtoblogacademy.blogspot.com/2009/03/how-to-add-paypal-donate-button-to-your.html"'>

<meta content='How to add Paypal Button to your Blogger Blog, Adding Donations to your blog' name='description'/>

<meta content='Adding,Paypal,Donate,Button' name='keywords'/>

</b:if>
Just like the above procedure, you can add different meta tags to as many blog posts as you can.
Read More

How To Add Meta Description to Each Blogger Post

December 30, 2018 0
Meta description tag is very important to display your blog on top in Google and other search engines search results. Now adding meta tags to each blogger post is easy. Blogger officially supporting for this. Follow the steps below add meta descriptions for your blogger posts.
First go to "Settings" -> "Search preferences".

Click on "Edit" link of "Meta tags" section.
Clicks on a "Yes" radio-button to enable search description.
Enter a meaningful meta description into textarea and save changes.
Go to create a new post or go to edit your existing post. Now you can see new option called "Search Description".

Click on "Search Description" option add your meaningful meta description into the textarea.
After that click on "Done" and publish/update your post.
Now you have successfully added a meta description for your post.
If you are looking for how to add both meta description and meta keywords for each blogger post, then read this tutorial:
How To Add Different Meta Tags to Different Blogger Posts
Read More

How to Add META TAGS to Blogger(blogspot) blogs

December 29, 2018 0
Adding meta tags you can get get more traffic from search engines like Google,Yahoo,Bing,etc. Especially the meta description is the most important one.
Meta tags are the tags which describes your site and tells the search engines what your site is all about. Adding meta tags is an important factor in SEO. (Search Engine Optimization). Meta tags allows search engines to index your web pages more accurately. In other words,Meta tags communicate with the search engines and tells more information about your site and make it index correctly and accurately.
We must add two main meta tags to the head section of the template.One is the Meta description which describes your site and another one is Meta Keywords which tells about your site keywords(what your site is all about)
Here is how to add meta tags to your blogger(blogspot) blog:
1.Go to "Template" --> "Edit HTML" of your blog.
Template Edit HTML
2.Find this code:
<b:include data='blog' name='all-head-content'/>
3.Now add below code just after the above code.
<meta content='DESCRIPTION HERE' name='description'/>
<meta content='KEYWORDS HERE' name='keywords'/>
<meta content='AUTHOR NAME HERE' name='author'/>
Look at the example below:
Replace,
DESCRIPTION HERE: Write your real blog description
KEYWORDS: Write the keywords of your blog
AUTHOR NAME: Write the author's name(Your name)
Now save your template. You have successfully added meta tags to your blogger blog.
You might also like these:
Complete SEO Guide For Blogger|Blogspot
How To Add Different Meta Tags to Different Blogger Posts
How To Add SEO Friendly Custom Permalinks for Blogger Posts
How To Install Dynamic Meta Description Tags
How To Change Heading Tag For Better SEO in Blogger
How To Add Meta Description to Blogger using Blogger Settings
Read More

Complete SEO Guide For Blogger|Blogspot

December 29, 2018 0
This Article will provide you complete guide on search engine optimization (SEO) for blogger templates.If you have any other ideas please leave a comment.

Meta Keywords and Description

Meta tags are very important for SEO.So you must add meta tags to your blogger blog for improve your seo.

  • How to Add META TAGS to Blogger(blogspot) blogs
  • Add Different Meta tags to Different Blogger Posts
  • How To Install Dynamic Meta Description Tags

Submit Your Sitemap to Search Engines

  • HOW TO SUBMIT BLOGGER SITEMAP TO GOOGLE
  • How To Submit Blogger Sitemap to MSN and Ask.com
  • How To Submit blogger sitemap to yahoo

Change Blogger Default Title Tag


Default page title for a single Blogger post is BLOG TITLE: POST TITLE. You can improve SEO by changing the title tags to POST TITLE ~ BLOG TITLE.
  • How To Change Default Title Tag on Blogger for SEO

Change Blogger Default Heading Tag


Heading Tag (h1, h2, h3, h4, h5) is also important for SEO. All of Blogger widgets (gadgets) title use h2 or h3 tags. If you want to improve SEO, you need to use h1 tag for post title.
  • How To Change Heading Tag For Better SEO in Blogger

Use Social Bookmarking Services


Adding social bookmarking links can help you build your traffic and improve SEO.
  • How To Add Big Social Bookmarking buttons
  • How To Add jQuery Social Bookmarks icons
  • How To Add Sexy Social Bookmark to Blogger
  • How To Add Addtoany Social Bookmarking Widget
  • How To Add SocioFluid Bookmarking Widget
  • How To Add Retweet Button in Blogger
  • How To Add Save to del.icio.us button with Hit counts
  • How To Add 'Digg it !!!' Link to blogger posts
  • How To Add 'Stumble it' Link to blogger posts
  • How To Add 'Reddit' Link to your blogger posts
  • How To Add 'Twit this' Links to blogger posts
  • How To Add 'del.icio.us' Links to blogger posts
  • How To Add 'Share on Technorati' Links to blogger

Use Related Posts Widget

  • How To Add jQuery Related Posts Widget for Blogger
  • Nice Related Post Widget For Bloggers
  • Add Related Post Widget to Blogger-Original Templates
  • Add Related Post Widget to Blogger-Modified Templates
  • Instant Related Post Widget For Blogger

Use Read More... Feature

  • Auto 'Read More' Feature with Thumbnails
  • Jquery Read More-Expandable Post in Blogger
  • Add Auto 'Read More' Feature to blogger
  • Add 'Read More' Feature to blogger
  • How To Create Expandable Post Summaries

Use Recent Posts,Recent Comments Widgets

  • How To Add Recent Posts Widget with Thumbnails
  • How To Add Recent Posts Widget to blogger
  • Add Scrolling Recent Posts Widget to blogger
  • Add Recent Comments Widget For Blogger Blog

Use Popular Post Widget

  • Add Popular Post Widget - with comments count
  • Add Popular Post Widget-without comments count

Use Labels / Tag Clouds

  • How To Add New Blogger Tag /Label Cloud Widget
  • Add Flash Animated Label Cloud Widget to Blogger

Use Breadcrumb


You can use breadcrumb to provide easy navigation for your visitor and increase page views.
  • How To Add Breadcrumb to Blogger

Submit Blog to Blog Directories

  • Submit Blog to Blog Directories to increase Traffic
Read More

How To Add SEO Friendly Custom Permalinks for Blogger Posts

December 29, 2018 0
Blogger has introduced another new and very useful feature - custom permalinks for blogger posts. Now you can use SEO friendly custom URL for blogger posts. Also most importantly there is not 39 character limit further with this blogger custom permalinks.
To create your own URL for a specific post, simply click "permalink" and select "Custom URL", and enter your customURL in the field given. If you wrote the post in July of 2012, your new URL will look like this:
http://YOURBLOG.blogspot.com/2012/07/customURL.html
The red colored bolded area is the portion of the URL that is customizable.
If the custom permalink you entered already exists, Blogger will attempt find a free one for you.
At present, the characters allowed in a custom URL are limited to: a-z, A-Z, 0-1. The only special characters available are underscore, dash, and period.
Read More

How To Add Google+ Profile Badge to Blogger

December 29, 2018 0
Google offers slightly different versions of the badges for Google+ pages, profiles, and communities. Google+ profile badge allow people to easily find you on Google+ and add you to a circle directly from your website. It will help you to get more recommendations for your site in Google search and grow your audience on Google+.
Adding Google+ profile badge to your site is simple.
1. First login to your google account and go to: https://developers.google.com/+/web/badge/
GooglePlus Profile Badge Settings
2. For "Google+ user", select your Google+ profile name.
3. For "Features", select "Badge".
4. You can change the width of your Google+ profile badge. So change the width as you like.
5. Two Color Themes are available for this badge. Select "Light" or "Dark" color.
6. You can enable or disable "Cover Photo".
7. Also enable or disable "Tagline".
8. Select the language you prefer.
9. No need to change "Advanced options".
10. Now you can see the code for Google+ profile badge.
GooglePlus Profile Badge Code
Copy that code. Code will more similar to below code. It have 2 parts:
<!-- Place this tag where you want the widget to render. -->
<div class="g-person" data-width="301" data-href="//plus.google.com/102090464826236196083" data-rel="author"></div>

<!-- Place this tag after the last widget tag. -->
<script type="text/javascript">
(function() {
var po = document.createElement('script'); po.type = 'text/javascript'; po.async = true;
po.src = 'https://apis.google.com/js/plusone.js';
var s = document.getElementsByTagName('script')[0]; s.parentNode.insertBefore(po, s);
})();
</script>
11. Go to "Layout" of your blog and enter first part of the code into "HTML/Javascript" box and add it to the sidebar.
Add Googleplus Profile Code to HTML-JavaScript Box
12. Go to "Template"->"Edit HTML" and add second part of the code just before </head> tag.
Add Googleplus Profile Code to Header
Save your template and refresh your site. Google+ Profile Badge will display on sidebar of your blog.
Read More

How To Submit blogger sitemap to yahoo to index your web pages

December 29, 2018 0

Submitting your site to yahoo is easy and give your web pages more exposure.
All you need is a YAHOO ACCOUNT(ID).However,you don't need an yahoo ID to know the information like how many pages are indexed,etc.But,if your blog is a new one or no pages in your blog are indexed(type your blog url in yahoo search and see to check whether your web pages are indexed or not), then you want Yahoo id to submit your sites,feeds,etc.
Let't see how to make yahoo index your webpages by submitting your blog sitemap.
2.Click on the 'Sign in' link which is at the top of the page (If you don't have a Yahoo id, you can get one here) to sign into your account.
3.Type your blog url in the box provided and click on the 'Add My Site'
4.After adding your site,you need to Authenticate(Verify your ownership).
Now click on the site name which submitted you and then click 'Authenticate' in the next page.
There are two ways to verify your ownership.One is to upload a file to the root directory of your site which can't be possible in blogger.
Another one is to 'adding a metatag' which is possible and the only way to verify ownership for bloggers.First,copy the metatag..
Next,sign in to your blogger account>Edit html and paste the metatag below the head tag and SAVE THE CHANGES.
When you return to Yahoo! Site Explorer, click the button that says “Ready to Authenticate
Next,you will get a message saying that 'Your site is pending authentication'
Note:Don't remove the metatag,they will revalidate your ownership by checking your ownership regularly.
5.Next,go back to the 'Site explorer home', and check the box next to your blog url and click on the Manage button.
6.Type rss.xml or atom.xml in the box provided.It helps yahoo to discover more of your site content via your rss or atom feeds and to index your blog pages quickly whenever your blog is updated.Next,click on the add feed button.
That's it.Now,you have successfully submitted your blog sitemap to yahoo.Check your account after a couple of days and you will see your blog indexed in yahoo search engine.
Meanwhile,if you didn't submitted your blog sitemap to google,please read this about 

How to Submit your blog sitemap to Google
Read More

How To Add Meta Description to Blogger using Blogger Settings

December 29, 2018 0

Adding Meta Tags to Your Website

A meta tag is an HTML tag containing information for search engines about a specific website. Meta tags contain keywords or phrases alerting search engines of a website's content to be included in search results for users requesting related information.
Meta tags should be placed in the portion of each Web page you want indexed by the search engines. You should consider placing meta content for the following tags:
  • Title Tag — The title meta tag is the most important element in the site optimization process. Many search engines pay particular attention to keywords that occur in the title tag. As well, search engines generally display the title tag's contents in their site listings.
  • Description Tag — The description meta tag defines site information a search engine displays when it lists the site. The description meta tag should concisely explain the nature and contents of the page.
  • Keywords Tag — The keywords meta tag lists the search keywords for a site. The keywords entered here should reflect any words or phrases Internet users might use to search for the site. Although many search engines have ceased to incorporate this tag into their ranking procedures, it's still a good idea to add this tag before submitting a page.
search
The method of inserting meta content in to your website varies depending on what program or application you used to build the site. Use this method if you have access to the HTML pages of your site:

To Add Meta Tags to Your Website

  1. Open a text editing program, such as Notepad.
  2. Log in to the Web hosting account provided to you by your hosting provider.
  3. In the text editor, open the Web page you want to add the meta tags to.
  4. In the portion of the file, insert the meta content. Here is an example of proper meta tag placement for a real estate website:
    <html>
    <head>
    <title>Premier East Valley Realty - Homes for Sale</title>
    <meta name="description" content="Premier East Valley Realty
    specializing in luxury real estate. We are your location
    specialists.">
    <meta name="keywords" content="Real Estate,Agent,Realtor,Buy,
    Home,Sell,Homes,Sale,Broker,Commercial,invest,investing,investor">
    </head>
  5. Save the file.
  6. Upload the Web page to the server.
 Note: Visit your website to verify the meta content uploaded correctly. Navigate to the page you updated, right-click on the page, and then select View Page Source in Firefox®, or View Page in Internet Explorer®. If placed properly, the meta content displays in the portion of the code.


Meta description tags are very important to optimize your blog in search results. With new Blogger interface we can add a meta description tag to Blogger blog without editing template's HTML. But you can not add meta keywords to your blog using Blogger Settings.
Meta Descriptions, which are HTML attributes that provide concise explanations of the contents of web pages, are commonly used by search engines on search result pages to display preview snippets for a given page. (from http://www.seomoz.org)
Go to Settings -> Search preferences.
Click on "Edit" link of "Meta tags" section.
Clicks on a "Yes" radio-button to enable search description.
Enter a meaningful meta description into text area and save changes.
Now you have add a meta description for your blogger blog.
Note:
But if you prefer to add meta tags(meta description, meta keywords, ...) directly to your template(using Edit HTML), read this article:

Read More

Post Top Ad

Your Ad Spot