
Do you like to add a good looking social subscribe widget to your blog? Then simply follow the steps given below.
1.Login to your blogger account and go to "Edit HTML".
2.Scroll down to where you see </head> tag .
3.Copy below code and paste it just before the </head> tag.
<style type='text/css'>
@import url(https://fonts.googleapis.com/css?family=Lora:400,700);

#subscribe-btt {
    margin: 0;
    padding: 10px;
    background: #eee;
    border: 3px solid #e8e8e8;
}

#subscribe-btt:hover {
    background: #e9e9e9;
    border: 3px solid #ddd;
}

#subscribe-btt h2.mysocialurl {
    border: 0;
    margin: 0 0 8px 0;
    padding: 0 0 0 56px;
    height: 48px;
    line-height: 48px;
    font-size: 14px;
    font-style: normal;
    font-weight: bold;
    font-family: Lora;
}

#subscribe-btt h2.my-twitter {
    background: url(https://blogger.googleusercontent.com/img/b/R29vZ2xl/AVvXsEjI5pK-pHEIIgVsC7cMuti2DYX2oZaw2LjkGwlPuOpAkDM1HN9yKKRtr4E1VZHA6cKZZiwPrcyMa47qTfqbYyVa7MPk3ROpWfzmLsTXxfxAm0lCBgoiPlU1CuDi6q4no_wm1-gUl7r-6n3i/s1600/twitter.png) no-repeat top left;
}

#subscribe-btt h2.my-facebook {
    background: url(https://blogger.googleusercontent.com/img/b/R29vZ2xl/AVvXsEiztt8SXZePhM4Qu3R-82bCkqEMRFP9phP-2BjIKH-t2fMukGjisp045lfUzOQ1q5xuY85na9TTBxlThz6HcjUxDlF06zsTODuWxIBkLdpogeLXDBSSgroHFVgaVvJSPafoKpXsv7nY9Qrm/s1600/facebook.png) no-repeat top left;
}

#subscribe-btt h2.my-googleplus {
    background: url(https://blogger.googleusercontent.com/img/b/R29vZ2xl/AVvXsEhbrXZOZsNspd78iETdGbgBusnsGgLHFUBRE71X4sj2oQcGSzSP-dJwBH-v5SkInxU0ZFnQqk4xH5iIPsCyqc06YQX_ktgk2863Px9VWWv8voslpPVKJbkV-P_yBKR7qQGaROMgyQy3OcJM/s1600/google_plus.png) no-repeat top left;
}

#subscribe-btt h2.my-pinterest {
    background: url(https://blogger.googleusercontent.com/img/b/R29vZ2xl/AVvXsEhi05WFxzNNytgz4uJujKdSV1JcZoJeff5cjM_-yNyQb_KDq3xRjBk7vsydBHByC3W6Tzp69tTVNiD4uT7RzDRlCsu9Sfm68yixSkZZO0x73xX2K1iXu3Y2fVixKhimzXLS9tIPg96B8pCd/s1600/pinterest.png) no-repeat top left;
}

#subscribe-btt h2.my-instagram {
    background: url(https://blogger.googleusercontent.com/img/b/R29vZ2xl/AVvXsEgDFHV4Rc2Zbiz6ngjeKQyYGkCPmeWyvRVcq2Y0qbSqPj2-sdwpT57MKCPE6oZRGIr6u1guAFBp5eaWOkphPbxzseucg0eOY-bYhZRjFsDwu7yDOUCIa8dJOk7oqEAvrRGsk-54Bd_JI1E4/s1600/instagram.png) no-repeat top left;
}

#subscribe-btt h2.my-linkedin {
    background: url(https://blogger.googleusercontent.com/img/b/R29vZ2xl/AVvXsEhKpJ7jeXxQE-OPM_esEfNNAxpwk-pvKAvls2N4PgfkyCZ_n_DU9aZNmaF8gHQjgeIzMJWfWCqEa57eBa9AwjtkRK5ZnFeaQdULunJM_f9_deruTQg1wm9Nr90RWW4MWNecRlzBkbaQmUJq/s1600/linkedin.png) no-repeat top left;
}

#subscribe-btt h2.my-youtube {
    background: url(https://blogger.googleusercontent.com/img/b/R29vZ2xl/AVvXsEh7IYC0WNAmfdql8pGDr6Y3irVyv0kpAF73hZTHOaVo_IPL2HcDfdg67lHmC9VPuFetmBHPjNe6IDtRB7G6Hvk6cwQ6U04wcjJzUm-K2wYq3fXxTKqTxYAmB6bR1iMaFsoZyQg7IJ_-3AD6/s1600/youtube.png) no-repeat top left;
}

#subscribe-btt h2.my-rss {
    background: url(https://blogger.googleusercontent.com/img/b/R29vZ2xl/AVvXsEiolTEP7sLsh2nfZoVgx97Nt7PFwC3PYYTShP67pdP8_Y4mF74xBt5KVwuR6S5ltBifK-XEzD2COJzPLolZnkjJcs8sWCAEwuFQh1LGrGU0YmYnr9eAVTu_6Zo5U5RenfR9uaHUSY_qOkVw/s1600/rss.png) no-repeat top left;
}

#subscribe-btt h2.my-email {
    background: url(https://blogger.googleusercontent.com/img/b/R29vZ2xl/AVvXsEgR-yjD_8zGtGXQXPYaqlxzzbDWWgBY-5cTu0h7VVJd9HOgAuzRonNllEP8HLoQ3YXtgMHBsU4MLuttwnWmgA2PbBg4p0EGwFZ7nGyCV2pKPELhr7yqWOrQRJ58gAxqdGva8iCVgQZGwmn3/s1600/mail.png) no-repeat top left;
}

#subscribe-btt .mysocialurl a {
    color: #252e28;
    text-decoration: none;
}

#subscribe-btt .mysocialurl a:hover {
    color: #000000;
    text-decoration: underline;
}
</style>
4.Now go to "Layout" and click on "Add a Gadget".
5.Select "HTML/JavaScript" and add the code given below and click "Save".
<div id="subscribe-btt">

<h2 class="mysocialurl my-twitter"><a href="YOUR-TWITTER-URL">FOLLOW ME ON TWITTER</a></h2>

<h2 class="mysocialurl my-facebook"><a href="YOUR-FACEBOOK-URL">FOLLOW ME ON FACEBOOK</a></h2>

<h2 class="mysocialurl my-googleplus"><a href="YOUR-GOOGLE-PLUS-URL">FOLLOW ME ON GOOGLE PLUS</a></h2>

<h2 class="mysocialurl my-pinterest"><a href="YOUR-PINTEREST-URL">FOLLOW ME ON PINTEREST</a></h2>

<h2 class="mysocialurl my-instagram"><a href="YOUR-INSTAGRAM-URL">FOLLOW ME ON INSTAGRAM</a></h2>

<h2 class="mysocialurl my-linkedin"><a href="YOUR-LINKEDIN-URL">FOLLOW ME ON LINKEDIN</a></h2>

<h2 class="mysocialurl my-youtube"><a href="YOUR-YOUTUBE-URL">FOLLOW ME ON YOUTUBE</a></h2>

<h2 class="mysocialurl my-rss"><a href="YOUR-RSS-FEED-URL">SUBSCRIBE VIA RSS</a></h2>

<h2 class="mysocialurl my-email"><a href="YOUR-FEEDBURNER-EMAIL-SUBSCRIPTION-URL">SUBSCRIBE VIA EMAIL</a></h2>

</div>
NOTE : In above code, replace pink colored codes with your social profile URLs.
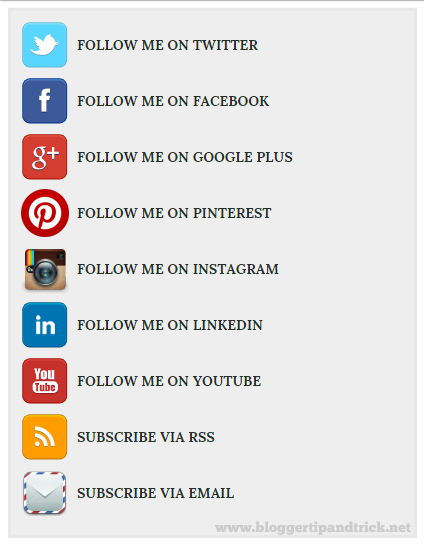
Final result will look like this:


 Best Blogger Designs, Tips, Tricks, Tools, Basic To Advanced Training, Money Making Tips, SEO, Traffic Genaration Methods, Free Templates, Free Hosting Tricks.