Best Blogger Designs, Tips, Tricks, Tools and Basic to Advanced Training

Best Blogger Designs, Tips, Tricks, Tools and Basic to Advanced Training

Best Blogger Designs, Tips, Tricks, Tools, Basic to Advanced Training, Money Making Tips, SEO, Traffic Genaration Methods, Free Templates, Free Hosting Tricks

Hot

Post Top Ad

Your Ad Spot

How to Make a Blog Contents by Label

January 29, 2019 0

table of contents based on label
A table of contents / sitemap of blogs based on labels is a list of blog article titles and their links grouped by label or category. So that it will make it look more neat and cool, of course. Besides that, it can make it easier for users to choose and find what they want.
This table of contents can be installed as a blog widget. But, most bloggers prefer to install this table of contents on a static page (Pages). The reason, so that it looks more professional.
Here is how to create a table of contents based on a label on the Blog's static page.
1. Enter Blogger, then select the Blog that you want to create the table of contents for.
2. On the left Blogger menu select Pages, then click New page.
3. Make a title on the page, then copy the script code below, then paste it as the contents of the page. Please see the demo to make sure, is the code correct ???

DEMO

  1. <style>

  2. p.labels a{color: #242424; text-transform: uppercase;font-size: 15px;}

  3. a.post-titles {}

  4. ol li{list-style-type:decimal;line-height:25px;}

  5. </style>

  6. <script>

  7. //<![CDATA[

  8. var postTitle=new Array();var postUrl=new Array();var postLabels=new Array();var postRecent=new Array();function sitemaplabel(a){function b(){if("entry" in a.feed){var d=a.feed.entry.length;numberfeed=d;ii=0;for(var h=0;h<d;h++){var n=a.feed.entry[h];var e=n.title.$t;var j;for(var g=0;g<n.link.length;g++){if(n.link[g].rel=="alternate"){j=n.link[g].href;break}}var o="";for(var g=0;g<n.link.length;g++){if(n.link[g].rel=="enclosure"){o=n.link[g].href;break}}var c="";if("category" in n){for(var g=0;g<n.category.length;g++){c=n.category[g].term;var f=c.lastIndexOf(";");if(f!=-1){c=c.substring(0,f)}postLabels[ii]=c;postTitle[ii]=e;postUrl[ii]=j;if(h<10){postRecent[ii]=true}else{postRecent[ii]=false}ii=ii+1}}}}}b();sortBy="titleasc";sortPosts(sortBy);sortlabel();tocLoaded=true;displayToc2()}function sortPosts(d){function c(e,g){var f=postTitle[e];postTitle[e]=postTitle[g];postTitle[g]=f;var f=postUrl[e];postUrl[e]=postUrl[g];postUrl[g]=f;var f=postLabels[e];postLabels[e]=postLabels[g];postLabels[g]=f;var f=postRecent[e];postRecent[e]=postRecent[g];postRecent[g]=f}for(var b=0;b<postTitle.length-1;b++){for(var a=b+1;a<postTitle.length;a++){if(d=="orderlabel"){if(postLabels[b]>postLabels[a]){c(b,a)}}}}}function sortlabel(){sortBy="orderlabel";sortPosts(sortBy);var a=0;var b=0;while(b<postTitle.length){temp1=postLabels[b];firsti=a;do{a=a+1}while(postLabels[a]==temp1);b=a;sortPosts2(firsti,a);if(b>postTitle.length){break}}}function sortPosts2(d,c){function e(f,h){var g=postTitle[f];postTitle[f]=postTitle[h];postTitle[h]=g;var g=postUrl[f];postUrl[f]=postUrl[h];postUrl[h]=g;var g=postLabels[f];postLabels[f]=postLabels[h];postLabels[h]=g;var g=postRecent[f];postRecent[f]=postRecent[h];postRecent[h]=g}for(var b=d;b<c-1;b++){for(var a=b+1;a<c;a++){if(postTitle[b]>postTitle[a]){e(b,a)}}}}function displayToc(a){var l=0;var h="";var e="Post Title";var c="Category";var j="";if(postFilter!=""){j="Click to view all"};if(l==postTitle.length)var b=document.getElementById("toc");b.innerHTML=f+h}function displayToc2(){var a=0;var b=0;while(b<postTitle.length){temp1=postLabels[b];document.write("<p/>");document.write('<p class="labels"><a href="/search/label/'+temp1+'">'+temp1+"</a></p><ol>");firsti=a;do{document.write("<li>");document.write('<a class="post-titles" href="'+postUrl[a]+'">'+postTitle[a]+"</a>");if(postRecent[a]==true){document.write(' - <strong><span style="color: rgb(255, 0, 0);">Baru!</span></strong>')}document.write("</li>");a=a+1}while(postLabels[a]==temp1);b=a;document.write("</ol>");sortPosts2(firsti,a);if(b>postTitle.length){break}}};

  9. //]]>

  10. </script>

  11. <script src="https://montrosutro.blogspot.com/feeds/posts/default?max-results=9999&amp;alt=json-in-script&amp;callback=sitemaplabel"></script>


4. Don't forget to change the URL with your blog's url. And immediately publish in HTML mode. Please see, the contents of the cool blog have been created.
Note:
  • Once published, you should not edit or upload it again.
  • If you are forced to make edits, try to go directly into HTML mode.
  • If you enter via Compose mode >> HTML mode >> Edit >> Update = BROKEN
Read More

How to Create a Blogger Contact Form on a static page

January 29, 2019 0
Contact form is a form that visitors can use as a means to communicate privately via email with the owner of the blog / website. In general, the contact form consists of several fields such as name, email, and message to be conveyed.


The existence of Contact form on a website / blog. Can be used as an indicator that the site has seriousness in management, so that it can increase the user's trust in what's inside. 

Actually Blogger.com has provided a free contact form feature / service that can be installed as a contact form widget on Blogspot. But, it seems that we rarely find a blog that uses a contact form widget. They prefer to make contact forms on static pages, even though they have to use contact form services from third parties. 

In this tutorial I will explain how to create / install the Blogger Contact Form on the blog's static page. Please follow the steps below. 

1.Enter Blogger , select the Blog that you want to create the contact form page. 

2. Select the Pages menu, then click New page. 

3. Create a page title, for example Contact Us, Contact Me, Contact Us, or others. 

4. Enter HTML mode(nextcompose), then copy and paste the code below as the contents of the page.
<script>
var blogId = '134777113111111111';
var contactFormMessageSendingMsg ='Mengirim...';
var contactFormMessageSentMsg = 'Pesan sudah dikirim. Semoga Anda bahagia.';
var contactFormMessageNotSentMsg = 'Pesan tidak dapat dikirim. Coba lagi nanti.';
var contactFormEmptyMessageMsg = 'Bidang pesan harus diisi.';
var contactFormInvalidEmailMsg = 'Alamat email harus valid.'

var widgetLoaded=false;
function sendEmailMsg() {
if(widgetLoaded== false) {
_WidgetManager._RegisterWidget('_ContactFormView', new _WidgetInfo('ContactForm1', 'sidebar', null, document.getElementById('ContactForm1'), {'contactFormMessageSendingMsg': contactFormMessageSendingMsg , 'contactFormMessageSentMsg': contactFormMessageSentMsg , 'contactFormMessageNotSentMsg': contactFormMessageNotSentMsg , 'contactFormInvalidEmailMsg': contactFormInvalidEmailMsg , 'contactFormEmptyMessageMsg': contactFormEmptyMessageMsg , 'title': 'Contact Form', 'blogId': blogId, 'contactFormNameMsg': 'Name', 'contactFormEmailMsg': 'Email', 'contactFormMessageMsg': 'Message', 'contactFormSendMsg': 'Send', 'submitUrl': 'https://www.blogger.com/contact-form.do'}, 'displayModeFull'));
widgetLoaded=true;
document.getElementById('ContactForm1_contact-form-submit').click();
}
return true;
}
</script>
<div class="Form">
<form name="contact-form">
<p></p>
Nama
<br />
<input class="contact-form-name" style="max-width: 400px; width: 100%;" id="ContactForm1_contact-form-name" name="name" size="30" type="text" value="" />
<p></p>
Email
<span style="font-weight: bolder;">*</span><br />
<input class="contact-form-email"style="max-width: 400px; width: 100%;" id="ContactForm1_contact-form-email" name="email" size="30" type="text" value="" />
<p></p>
Pesan
<span style='font-weight: bolder;'>*</span>
<br />
<textarea class="contact-form-email-message" style="max-width: 400px; width: 100%;" id="ContactForm1_contact-form-email-message" name="email-message" rows="5"></textarea>
<p></p>
<input class="contact-form-button contact-form-button-submit" id="ContactForm1_contact-form-submit" onclick="sendEmailMsg()" type="button" value="Kirim" />
<p></p>
<div style="max-width: 400px; text-align: center; width: 100%;">
<p class="contact-form-error-message" id="ContactForm1_contact-form-error-message"></p>
<p class="contact-form-success-message" id="ContactForm1_contact-form-success-message"></p>
</div>
</form>
</div>


5. Change the code marked in red with the blog code owned by your blog. To get the code, you can see it on the bar address on any page from your blog's dashboard. See the example in the picture below.
Example Blog Id


6. Disable the comment column, then immediately publish the contact form page in HTML mode. 

7. See or visit your contact form page, then try sending a message to find out if the contact form works as expected. 
Read More

How to Register a free Blog on Blogger via an Android phone

January 29, 2019 0
Technological developments that are very fast provide a lot of convenience for us to do things that previously could not be able and easy. Previously to create a website or blog can only be done using a desktop device, but now, we can create a blog using only an cellphone or smartphone. For example this blog, I created using an Android smartphone, both for writing articles, making pictures, editing images, to edit HTML on themes (formerly called templates). All I do with an Android smartphone.
Android Blogger

Many platforms provide services for creating blogs, such as Blogger, Wordpress, Jomla and Mywapblog. However, here I will only explain how to create a free blog on Blogger / Blogspot via an Android phone. Because in my opinion Blogger is the best platform to create a blog, besides 100% free, Blogger is also very easy to use, even if you are a beginner. The proof is that I myself am a blogger who started blogging from scratch and only relied on Google as a place to ask. And one more thing, Blogger is one product from Google, the king of cyberspace.

Actually there is almost no difference between how to create a blog through HP by creating a blog via desktop / laptop. The difference is only about email from Gmail.

Strengths and disadvantages How to Make a Blog on an Android phone / smartphone.

  • No need to make an email, because I'm sure every Android phone already has a Gmail account that was created when it first started operating your Android cellphone / smartphone to access the Play Store and various services from Google. However, if you haven't had the chance to create a Gmail account, please follow the tutorial on how to create a Gmail account on an Android phone .
  • Which is clearly more efficient internet data quota, because the smartphone screen size is smaller than the desktop, so it doesn't use too much internet data and is certainly more practical.
  • As for the disadvantages, maybe only when editing HTML, it's a bit difficult, but there's no need to worry because I have a solution, please read How to edit the HTML template on your Android phone .

Here's how to register Blogger via an Android cellphone / smartphone. 

1. Visit the site www.blogger.com , after opening then click Create Blog
Register Blogger via cellphone

2. Fill in the password or password from your Gmail account, click enter.
Google email


3. Next you are told to confirm the profile that will be displayed on each published post / article. If you want the Google+ profile displayed then just click continue to Blogger. But, if you want to use another identity such as a pseudonym, please click switch to a limited Blogger profile to set the profile to be displayed.
Blogger Profile

4. Click Create a New Blog
Create a new blog

5. In the new page window, fill in the blog title and blog url address.
Blog title and address

Title : write the blog title as you wish, it should be short and easy to remember, if possible adjust to the general topic of the content you want to present 
Example: 
Somad Blog's 
How to Somad 
Somad Food 

Address : write the blog address which will later become the url address of your blog. Use all lowercase letters, don't use spaces, and don't use any punctuation except for a period (.) And a minus sign (-). Use of numbers is also allowed. 
Example: 
somadblog 
somadblog77 
ways 

Wait until the process is complete

  • If an exclamation point appears with a red background along with the words "This blog address is invalid or not supported". That means there is a writing error, please change it.
  • If an exclamation point appears with a yellow background with the words "Sorry, the address is not available". That means the address / url has been used by someone else, please change it.
  • If a check mark appears along with the words "Address this blog is available". That means you can use the address / url.

Select the theme / template you want to use. Just choose a Simple / Simple theme first. You can change theme affairs later. 

"Or maybe you are interested in using a modified Blogger template to be responsive and mobile friendly" , you can see the list HERE . 

6. Click Create Blog. 

Congratulations, you already have a blog that is ready to be filled with articles. 

Also read: 

How to login / enter a Blogger account via HP Android 

How to register a new blog on Blogger

To create a new blog, you no longer need to create a new Blogger account. Just enter Blogger, click the arrow in the upper left side next to the blog title, then select a new Blog(the very bottom). Follow the next steps as in step number 5 above.
Read More

How to Edit HTML Templates on Android Phones

January 29, 2019 0
For Bloggers whose name is edit HTML on a theme / blog template is something that is usually done to improve performance and simply enhance the appearance of the blog. To do that, starting from searching, writing, copying, pasting and deleting HTML codes in the blog template, it is easiest to use a desktop device (it seems like I don't have anyone). Well, the problem is if the devices available are only Android phones / smartphones. Here are some ways to edit HTML on a blog template with an Android mobile device.

Direct way

In the past when I started blogging, I usually just used the UC_Browser browser to do all activities related to editing HTML templates, because in terms of appearance and features almost the same as desktops. However, for some reason in the last few months in 2016, UC_Browser cannot be used to edit HTML. Let alone edit HTML, just to open a Blogger account is no longer possible. Instead, I now use two browsers to edit HTML templates, namely Crome and Firefox.

The advantages of Firefox for editing HTML
  • Looks like a desktop
  • It's free enough to place the cursor as desired
  • It is suitable for writing or just editing small parts
  • Can be used to copy the code in the template
Deficiency
  • Cannot be used to paste the code
  • Cannot be used to delete code in bulk

For Crome itself, it is only used to attach the copy code. Not bad for covering up the shortcomings of Firefox. 

Description: 
The above conditions are when this article is made, changes may occur at any time. And the Android that I use is the lollipop version. 

Also read: How to edit the widget whose edit button is hidden . 

Indirect way

is to use a special application to edit HTML. Of course before you have to upload the blog template first. 

How to upload / back up the blog theme.

  • Enter the Blogger account , select the blog you want to edit
  • Then click the Themes menu , on the top right page, click Backup / Restore .
  • In the new window click Download Theme .

After the download is complete, exit then open the DroidEdit application. If you don't have one, please visit the Google Play Store to download the DroidEdit application (free). 

How to use the DroidEdit application

1. Open the DroidEdit application on your Android phone. Click the button at the bottom left, then select the Open menu .

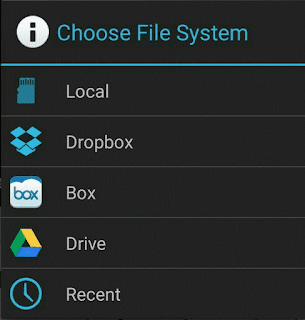
2. Select Local , then look for the Download folder

3. Select the theme / template file you want to edit. Please edit to your heart's content. 

4. When it's finished, click the button below the far left.

  • Select the Save menu if you want to save the edits by changing the old file.
  • Select the Save-As menu if you want to save with a new file, without deleting or changing the old file.

Info : Inside the DroidEdit application there is the Preview feature, It's just that the feature can't be used on the free version of DroidEdit. 

Return to the Blogger account to download the edited theme. 
Click Backup / Restore , in the new window click Select File . Click Upload . 

Tip : If you are not sure about the tutorial that has been followed, you should use a trial blog to see the edits before they are applied to the main blog, unless you are using the pro version of the DroidEdit application.
Read More

Post Top Ad

Your Ad Spot